Hacking up a Hot Hex / ..
I've made a homemade stove out of 6 inch pipe, which I test fired a few times outside to get rid of the nasty galvanized coating. I have a 6 foot rollup stainless steel pipe from TIgoat, and I'm hacking up a hole and stove boot to
velcro into a Golite Shangri-la 3. So far I have cut the hole, sewn in the velcto and made the stove boot - I will be doing a test fire once the glue dries on
the stove boot, and then if all is well making and sewing on a silnylon beak to
go over the top of the stove boot hole, and a silnylon patch with velcro on it to go in place of the stove boot so the tent can be used without a stove.
After waiting for the JB weld on the boot to dry overnight, I fired up
the stove in the hex, and it was mostly a success. It throws a *lot* of heat,
and yet the nylon around the boot doesn't get inordinately warm or threaten
to melt. Stove works very well, no smoke inside. my first iteration stove
boot has one problem though - the velcro came off - the JB didn't stick well
to the flashing - this may be my fault, I assumed the flashing was raw and would be ok, I didn't scuff it up before putting the epoxy on. I'll rough the edge
up with sandpaper and try to glue again.
update: ok, after sanding the edge of my aluminium stove boot and re-glueing the velcro, I've now done another test fire and everything held up well. the pipe is really nice and stable, and it and the stove draw well. The stove throws good heat for 20-30 minutes on a full load of wood, although in practice I would expect to be slowly feeding in pieces of squaw wood every 5-10 minutes. The
small firebox is offset somewhat by the large length of vertical stovepipe in the tent - which acts almost like a vertical tube garage heater - when going it puts out a *lot* of heat - which I really like because my intention is to use this when it's bloody cold! It appear nice and stable even when shaking the tent, and the slight angle seems to be just enough to keep the stovepipe out of the way for entering the tent, without cramping a potential 2nd person sleeping area, meaining it is still very doable to sleep 2 in the tent in a V, with the stove in the wider portion of that V. I now need to complete the job by sewing a silnylon beak over the top of the porthole, making a silnylon/velcro patch to use the tent without the stove, and making some stove legs and maybe a pot grate. More here as
I get further along, but I think I may very much like this rig!
Project costs:
So far the stove body has been "free" as it was leftover bits. I suspect it would have been about $15 for the pieces if I had to buy them. The aluminium flashing and velcro used for the boot were leftovers from roofing, and sewing a hammock bottom. The Stainless rollup stovepipe and rings cost me $55 from titanium goat. The golite shangri-la tent itself was $150 on ebay + $20 shipping.
| |
 |
 |
 |
 |
|
| |
The area to be affected... |
Measure and test... |
I have marked the centre, and outlined where to cut in sharpie |
Just what every sewing project needs. |
| |
 |
 |
 |
 |
|
| |
It cuts silnylon well.. |
|
The removed piece |
The hole |
| |
 |
 |
 |
 |
|
| |
Ok infernal machine... |
pinned on velcro |
|
Oh drat, the machine is cranky.. why? |
| |
 |
 |
 |
 |
|
| |
it's doing stupid things! |
Oh, the thread came out of this thinger.. |
and now it's stuck here?!?! |
Partial diassembly and blue language reveals many threads |
| |
 |
 |
 |
 |
|
| |
but I proceed boldly forward, and finish my velcro edge. |
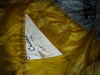
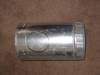
Now I need a stove boot - I cut one from aluminum flashing |
and cut velcro to size.. to attach to it. |
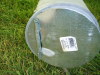
JB Weld - like duct tape - only liquid! |
| |
 |
 |
 |
 |
|
| |
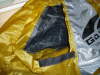
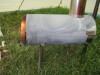
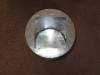
The aluminum stove boot, with velcro on the edges. |
Guys - when you try this remove the evidence of JB weld usage from the sewing room - it is normally frowned upon. |
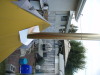
Ok, so set up the hex for some beta testing. |
My stove is made of 6" pipe with end caps, a door cut in one end cap, and a hole cut for a 3" stovepipe. the firebox is a foot long. |
| |
 |
 |
 |
 |
|
| |
door details- just bent sheet metal. |
|
side view - temporary legs and TIGoat Stainless stovepipe. |
I have lots of clearance. wait for the JB weld to dry. |
| |
 |
 |
 |
 |
|
| |
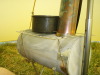
ok JB weld dried the velcro attaches the boot nice to the hex |
I did have to modify my boot to make the hole oval, because I had a dumb moment when I first made it. |
This shows the angle of the pipe, angled slightly away from the right hand side of the door - making it easier to get in. |
with the stove in the middle front. |
| |
 |
 |
 |
 |
|
| |
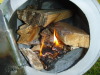
chuck in a little birchbark and wood, light it up |
|
Warms up well, but one minor problem... |
The jb weld didn't hold! - I didn't prep the aluminum flashing right for it. |
| |
 |
 |
 |
 |
|
| |
|
|
|
After sanding the edges of the boot, and re-JBwelding the velcro it seems to hold well. Here's the boot from the inside with the stove set up |
| |
 |
 |
 |
 |
|
| |
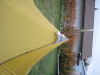
ok, let's load up for another firing. |
burning away and throwing *tons* of heat. it's *HOT* in here! |
The stove boot is now holding up well, and the tent bits appear to not be too warm. as I mentioned, I had to cut the boot ovally. having one of he wire pipe loops in there 'locks' the pipe into the boot well, making it very stable as it's held tight to the top of the tent. I will still probably take a bit of wire and wire the pipe to the interior tent pole for safety. Having the pipe come out of the stove in a windstorm while the stove is going would be double plus ungood. |
here's the lid at a nice place it sits - cracked open and drawing very well. no need for a vent hole on something this small. |
| |
 |
 |
 |
 |
|
| |
No need to get fancy for the pipe hole in the stove. I just cut a hole. it doesn't need to be "sealed" as as long as there's anything warm in there the pipe draws up, and sucks out, so you don't get any smoke. Any gaps here just serve to add a little breathing air to the stove and don't seem to affect it adversely at all. |
smoky whifferdills out the top of the pipe, about 20 minutes into a firing with load of wood. |
A couple of views of the tent with boot and stove installed and the stove going inside. |
My pipe is strictly longer than it absolutely needs to be, but I like this for several reasons - good draw, lack of sparks, and tall enough so that if I set up on snow with some depth under the tent for headroom I can still get the pipe out of the tent! |
| |
 |
 |
 |
 |
|
| |
a pile of wood for my next test.. |
how to set something atop a round stove body |
I have hacked up a kitchen cooling rack - weighs very little, and wired it around the stove body. |
My little AGG pot sits on it real nice.. |
| |
 |
 |
 |
 |
|
| |
|
ok, dryer lint, a kleenex, sticks... |
one good firesteel sparking ignites dryer lint.. |
and then put in some bigger stuff. |
| |
 |
 |
 |
 |
|
| |
took a minute or two to get going as above and I checked my watch.. |
after 12 minutes I have boiling appear.. |
and at 13 or so.. |
steam coming out from under lid.. |
| |
 |
 |
 |
 |
|
| |
and a roiling boil.... |
I loaded sticks into the stove 3-4 at a time, twice during this. |
it holds the boil for a loooong time on the coals in the stove. |
|
| |
 |
 |
 |
 |
|
| |
Shangri la on the scale with pole and pegs |
2 pounds 9 oz |
stove with pipe and wires on scale |
add in 4 snow stakes used to support stove |
| |
 |
 |
 |
 |
|
| |
3 pounds 3 1/8 oz. |
CCH also built his own stove |
|
|
created with
igal-wt


